What To Do When Your Roof Is Leaking
Mar 08, 2021
A leaky roof can cause extreme damage and rack-up costs for many homeowners. However, it’s possible to mitigate that damage, and the bill you’ll have to pay. Honey Bees Roofing & Solar has four easy steps so you’ll know exactly what to do when your roof is leaking in Burleson and its surrounding areas. Learn more about each step individually below or glance at the steps to quickly learn what to do when your roof is leaking!
-
Contain The Leak
-
Drain Trapped Water
-
Clean The Surrounding Area
-
Call A Trusted Professional
Step 1 – Contain the Leak
The first thing you should do if your roof has a leak is to stop the leak from damaging any possessions in your home. Move things away from the leak so that they’re out of the way. If something can’t be moved put plastic on it to prevent water damage. Make sure to cover electronics, furniture, and other valuables. Also, find a waterproof container to put under the leak. By containing the water where it’s leaking you can stop further damage. If controlling the leak is impossible, make sure to call a roofing contractor as soon as you can. Even if a contractor can’t get the material to repair your roof that day, they can install a waterproof tarp. This tarp will help ensure no extra water can get through into the roofing structure or worse, the home.
Step 2 – Drain Trapped Water
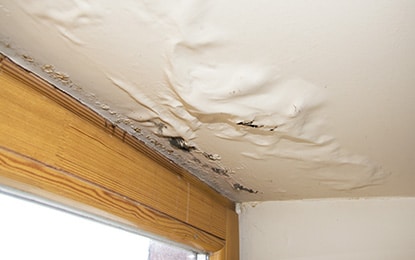
If you see paint on the ceiling bubbling or sagging then it’s likely holding water. These water pockets can do additional damage to the structure of your home. By popping them you can help alleviate pressure on the structural integrity of your roof. Putting holes in your ceiling voluntarily seems like a bad idea. However, if the water pockets aren’t drained they’ll do damage to the structural integrity of your home. Fixing small holes in your ceiling is easier and cheaper than repairing structural integrity. A small hole or slice in the paint is enough. Before puncturing, be sure all surrounding areas are safe and valuables are moved.
Step 3 – Clean the Surrounding Area
After the leak is contained, make sure that everything around it is okay. Carpet, furniture, woodwork, and anything else exposed to water needs to be dried. Water will leave stains as well as start the growth of mold. However, preventing mold is doable if you can ensure everything is dry. If you do have soaked carpet, pull it up from the padding. Both sides of the rug, as well as the padding, should be exposed to circulating air so it can dry. If the damage is extreme, call a professional water extraction specialist.
Step 4 – Call a Professional
Once as much damage as possible is prevented, it’s time to call a contractor to fix your roof. Most roofing contractors will come out as quickly as possible to determine where the leak is and throw up a tarp to prevent the leak from continuing. You’ll have to sign a waiver to allow them to put up a tarp, but make sure to read the full waiver. Some dishonest contractors may try to lock you into roofing work you don’t want to be done. They’ll hide this extra work in the waiver so when you sign it you’re stuck in a contract. Make sure to hire a local contractor, especially if a storm is the cause of the leak. Finding the right contractor is important, so you can trust you’re working with an honest, professional roofing contractor.
A leak is never convenient, but you now know what to do when your roof is leaking. If your roof does have a leak, follow the four steps above and then Contact Honey Bees Roofing & Solar online or give us a call at 817-668-6131 to schedule a free roof inspection and consultation!
